


What you need to know about insulated panels for walls and roofs
The following text about sandwich panels for walls and roofs is intended for beginners. It is intended to provide an introduction to the subject and provide information on various aspects such as transport, relocation, etc. Of course, this text can not replace any training. It is therefore always essential to have specialists who are familiar with the transport, storage and assembly of sandwich panels.
1. The basics: What are insulated panels?
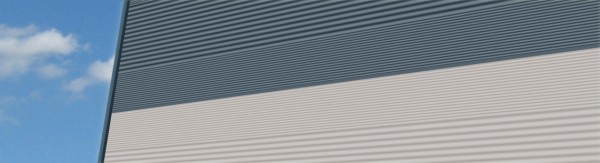 Smart and insulated: Facade made from insulated panels
As the name suggests, “sandwich” panels consist of several layers – usually two thin covering sheets and in between there is a core. That, however, is the only similarity between them and a sandwich! When it comes to durability, the sandwich panels are way ahead of their edible namesake: The individual layers are firmly connected with each other, and are therefore often referred to as composite panels.
Insulated panels, composite panels, or sandwich panels, come in a wide variety of designs. In most cases, the outer shell consists of a galvanised steel sheet. The inner shell can be made of galvanised steel sheet, thin aluminium sheets, stainless steel or GRP (glass-fibre reinforced plastic). The core is mostly made of insulating material such as polyurethane (PUR), polyisocyanurate (PIR), or rock wool. The joining of the outer and inner layers helps to combine the properties of the materials used: bending or breaking of the surface is made difficult thanks to the core, in turn the stability of the surface protects the soft core from external influences.
2. Using insulated panels
Insulated panels are used in many industries, such as aerospace, automotive and construction. This text focuses on the use of insulated panels as ready-made elements for the construction industry.
Insulated panels are perfect for the building sector: You save time, cut costs and reduce weight and they can be used as wall, ceiling and roof. If the panels come straight from the factory, they are immediately ready for use. In one easy step, they can be attached to a support structure and are simultaneously stable walls or roofs with excellent insulation properties.
Because of the above named properties, today insulated panels are particularly popular for lightweight construction of halls, roofs for residential buildings, but also as insulation panels for insulating or also as sound proofing in drywall construction. Insulated panels with a fireproof core are also often used as fire protection panels.
 Hall constructed from insulated panels
3. Types of insulated panels
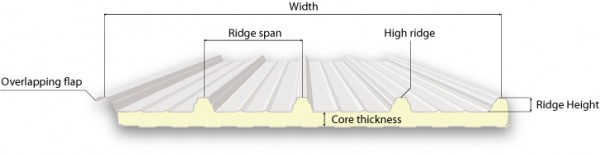
3.1. Insulated roof panels
Roof panels have two uses: as roofing insulation and roofing. They can be recognised at a glance by their regular elevations on the sandwich element. These elevations are known as high ridges and serve to stiffen the panel. Good stability is indispensable – especially in the case of roof panels – since they must not only carry their own weight, but also have to withstand potential snow loads or wind loads. The space between the two high ridges is known as the low ridge. This is where the core thickness is measured. In order to ensure a seamless transition between two roof panels, there is an overlapping flap on one side of the panel. This lies on top of the adjoining panel.
Roof panels are available in a wide range of RAL colours.
3.2. ECO roof panels
A special type of roof panels are the ECO roof panels. They are covered on the underside aluminium foil rather than steel. As a result, they are classed as single-use products according to building regulations and do not need to be approved. In addition to this legal advantage, ECO roof panels have many more plus points. The aluminium foil reliably protects against products such as ammonia, which can have a negative effect on the environment. As a result, ECO roof panels are particularly suitable for use in agricultural buildings, such as stables and barns.
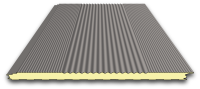
3.3. Insulated wall panels
Insulated wall panels have a lined profile for stability, instead of the high beadings on the roof panels. Since there is no overlapping flap due to the lack of a high ridge, the panels are connected with each other using a tongue and groove joint, which is more pronounced than on the roof panels. Optionally, it is also possible to use fastening screws, which are invisible from the outside, using a secret fixing system.
 Eurobox lined profile
 Micro-ribbed profile
 Double-lined profile with
secret fixings
 In detail: secret fixing
Wall panels can also be used as ceilings or floors.
3.4. Cold room panels
Cold room panels are a special form of wall panels. They are usually more insulated than normal insulated panels and have better quality of joints. This makes them ideal for the construction of refrigerated cold rooms and walk-in fridges. Cold room panels often also come in a food-safe coating.
4. Composition of insulated panels: the exterior
The outer shell of an insulated panel consists of several different layers, which protect the panel from environmental influences such as UV radiation and from corrosion. The following diagram provides a nice overview of the outer shell structure:

Since all the individual layers fulfill certain functions, it is important to analyse the environmental factors to which the panels will be exposed, before purchasing the insulated panels. After doing so, the right materials and coatings can then be selected. Since the exterior and interior sides of the insulated panels are frequently exposed to very different conditions, the lacquers and materials which are used, vary according to the side they are on. For example, the exterior shell should always contain a UV protection layer and in damp interior spaces, such as swimming pools, good corrosion protection should be used.
4.1. Exterior materials
There are several basic materials from which the outer shell of insulated panels are made. Here is an overview of the properties of the materials:
| Material | Use | |
| Sheet steel | Steel sheet metal is most often used in the production of insulated panels. The material impresses with its high stability. The sheet is galvanised and coated against corrosion | |
| GRP | GRP (glass fibre reinforced plastic) can only be used for the underside of the panels. The material is used in rooms with high exposure to chemicals or salt to prevent corrosion. GRP is not as fracture-resistant as metal. | |
| Aluminium | Sometimes, but not often, the shell of the insulated panel is made from aluminium. This material is particularly resistant to chemicals and salt and is therefore mainly used in the agriculture industry. Disadvantages include the high price and high thermal expansion, which can lead to structural problems. | |
|
Very rarely the shell is made from stainless steel. The advantage of this material is that it is completely rust-free and is food safe. The price of the material is, however, very high. We produce stainless steel insulated panels on request from a quantity of 2,500 m². |
Material thickness
The shell of the panels is available in different material thicknesses. Thinner material is lighter and less expensive but not so stable. In the case of thicker materials, it is possible to walk on a panel without damaging it. Typical values for the thickness of the steel sheet are 0.4mm and 0.6mm. Please contact us if you need any advice regarding thicknesses.
Galvanising
As corrosion protection, all our panels are galvanised in high-quality. Contact us if you have any questions about galvanisation.
4.2. Exterior coating
The coating offer further protection to the insulated panel and protects against corrosion and UV radiation. There are a variety of quality levels, depending on the situation the panels will be used in. The quality of the coating can be increased using one of the following two methods: through newly developed materials and coating methods or by a thicker coating. The standard coating applied to our insulated wall and roof is standard polyester with a thickness of 25 μ, exterior and interior. Most competitors offer only 15 μ. These are the coatings available:
| Pre-coated products | Standard thickness (μ) | Minimum time before appearance of white rust (in h) | Corrosion category |
| Standard polyester | 25 | 360 | RC2 |
| Polyester with high durability | 25 | 360 | RC3 |
| PVDF | 25 | 500 | RC4 |
| PVDF | 35 | 500 | RC4 |
| PUR-PA | 50/55 | 700 | RC5 |
| Plastisol | 100/200 | 1000 | RC5 |
| Plastic coated | 100 | 500 | / |
In order to make it easier for you to choose the right coating, we provide you here with a small decision aid based on EN 10169. Simply allocate your project to one of the following categories.
External environmental influences:
| Category | Description |
| C1 - very low | |
| C2 - low |
Surroundings with low pollution Agricultural areas |
| C3 - average |
Urban and industrial areas, medium levels of sulfur dioxide pollution Coastal areas with low salt content – between 10 and 20 km from the sea |
| C4 - high | Industrial areas and coasts with medium salt content, between 3 and 10 km from the sea |
| C5 I – very high | Industrial and coastal areas with high humidity and aggressive environments |
| C5 M – very high | Coastal areas with high salt levels, between 1 and 3 km from the sea |
Internal environmental influences:
| Category | Description |
| C1 – very low | Heated buildings with clean air: e.g. offices, shops, schools and hotels |
| C2 - low | Non-heated buildings where condensation is possible: store rooms, sports halls |
| C3 - medium | Production rooms with high humidity and reasonably high air pollution: e.g. food industry, laundries, breweries, dairy industry |
| C4 - high | Chemical installations, swimming pools, shipbuilding and coastal installations |
| C5 I – very high | Buildings or areas with constant condensation and high air pollution |
| C5 M – very high | Buildings or areas with constant condensation and high air pollution |
With the help of the following diagram, you can ensure you choose the right coating for both the exterior and interior shell of your insulated panels.

5. Composition of insulated panels: the core
The extraordinary insulation properties of insulated panels are largely achieved thanks to the insulation core, which is protected by the external sheets made from steel or aluminium. The core of the insulated panels can be made from a variety of materials and in different thicknesses. Following, we provide you with a short overview of the materials and their functions.
5.1. Polyurethane (PU)
Polyurethane is a synthetic resin used developed in the 1930s by Otto Bayer and his research group for IG Farben. We all know the material from around our households: our sponges are made from it. In the field of insulated panels, polyurethane is the most popular insulation material. But how good are the insulation properties? The following table is based on a standard-lined Eurobox type panel, and provides information on the insulation values (U-values) achieved according to the core thickness:
| U | Thickness of the panels (mm) | ||||||||
| 25 | 30 | 35 | 40 | 50 | 60 | 80 | 100 | 120 | |
| W/m² K | 0.83 | 0.70 | 0.61 | 0.54 | 0.44 | 0.37 | 0.28 | 0.22 | 0.19 |
| kcal/m² h °C | 0.71 | 0.60 | 0.52 | 0.46 | 0.38 | 0.32 | 0.24 | 0.19 | 0.16 |
5.2. Polyisocyanurate (PIR)
Polyisocyanurates have even better insulation properties when compared to polyurethane. Thus, the same insulation value can be achieved with a lower core thickness. In addition, insulated panels with a PIR core have better fire-rating values than those with a PUR core, withstanding higher temperatures for longer. Due to this, insulated panels with a PIR core are somewhat more expensive than PUR core panels.
5.3. Rock wool
If you happen to have special fire protection requirements, then there’s no way around panels with a rock wool core. In contrast to polyurethane and polyisocyanurate, rock wool is not combustible. However, this advantage is tempered by the fact that rock wool panel have a slightly poorer insulation properties. Take a look at the U-values based on the example of a standard-lined Eurobox profile:
| U | Nenndicke des Paneels (mm) | ||||||||
| 50 | 60 | 80 | 100 | 120 | 150 | ||||
| W/m² K | 0.75 | 0.63 | 0.49 | 0.39 | 0.33 | 0.27 | |||
| kcal/m² h °C | 0.65 | 0.54 | 0.42 | 0.34 | 0.28 | 0.23 | |||
6. Transportation of insulated panels
If you decide on using insulating panels as part of your construction plans, transport is the first step after placing your order. For panels with lengths of up to 24 metres, there are some very important rules that you need to pay attention to in order to ensure that the insulated panels arrive undamaged.
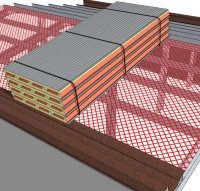
Insulated panels usually come packaged. In order to not damage the panels during transportation, these packages must be placed horizontally on spacers made from plastic foam or wood. Please note that the spacers must be placed at a suitable distance apart. The support surface should of course correspond to the shape of the package. That is to say, if the package is flat, the surface it lies on should be flat. If the package is curved, the surface it lies on should also be curved. When stack packages on top of each other, stacking spacers must be used between the packages..
It should also be ensured that packages do not overhang by more than one metre and are secured in at least two cross-sections using straps no further than 3 metres apart. When attaching the straps, it is important to ensure that the do not themselves damaged the panels. The loading surface of the vehicle should, of course, be empty and weatherproof.
7. Storage of insulated panels
For logistic reasons, it is sometimes necessary to store insulated panels on a construction site or in a warehouse. Please ensure that the panels never lie directly on the floor, but always on timber or polystyrene spacers, which are wider than the panel itself. The spacers must be adapted to the shape of the panels and correspond to the product. For example: for a package which is curved, the spacers must have the same curvature. If lack of space means stacking the packages on top of each other, please ensure that spacers are used between the individual packages. The upper spacers should be placed in exactly the same position as the spacers below. The weight of the packages should also be noted when stacking. A maximum of 3 packages with a maximum height of 2.6m can be stacked.
 The packs of panels should never be stored for an extended period in a damp environment, since condensation can collect on the poorly ventilated internal panels, and can corrode the metal. If short-term outdoor storage is necessary, it is important that the packages are not exposed to direct sunlight and that water runs off them. The inclination should be at least 5%. However, packets should not be stored outdoors for more than 60 days.
The best storage conditions for insulated panels are dry and dust-free rooms, which are also ventilated to some extent. From experience, we know that even under the best storage conditions, the storage period should still not exceed 6 months, as otherwise the properties oft he panels can change.
8. Lifting insulated panels
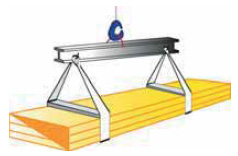
Even if insulated panelbelong to the lightweight construction elements, the length of them can mean they carry some considerable weight. For this reason, some basic instructions must be followed when lifting by hand or by crane.
When lifting a package by crane, synthetic sling belts (e.g. from nylon), with a minimum width of 10cm, must be placed in at least 2 places. The straps must have a minimum of half the length of the package. To prevent damage to the panels when they are lifted, apply strong and thin wooden or plastic spacers that exceed the width of the panels by at least 4cm.
When lifting the panels by hand, there should be two people working together. The panels should be always be carried with the horizontal edges upwards and downwards.
9. Cutting insulated panels
Sometimes it is necessary to cut down insulated panels to get them to working length on site.. For this purpose, the panels must be placed on a firm base and cut with a plunge saw, jigsaw or circular saw. It is important to make sure that the cutting surface does not become too hot during cutting. This could lead to the galvanization, and thus the corrosion protection, burning. Please do not use angle grinders or disc grinders as sparks could damage the anti-corrosion coating.
10. Fitting roof panels
.jpg) The substructure already in place, the insulated panels can now be put to good use
The substructure already in place, the insulated panels can now be put to good use
Insulated panels should always be fitted by experts. The following passage will provide a rough overview of the work.
The installation of roof panels will always be onto a substructure of timber, concrete or steel. When designing the substructure, it is imperative to include the calculation of the panel weight as well as the potential snow loads and wind loads in the region. From all this information, the distance between the supports (the purlins), onto which the panels are laid, can be determined. In order to get maximal drainage, the inclination of the roof must not be less than 5°. If the roof has a crossbar or roof penetrations, the roof should have a slope of at least 7°. Roof panels are therefore not suitable for flat roofs.
You’re now ready to go!
10.1. Laying the roof panels
 |
Before starting the construction, the substructure should be carefully inspected: To avoid corrosion, no incompatible materials should come into contact with the panels. Furthermore, before installing the panels, the gutter and cover plates on the sides of the eaves should be fitted. |
 |
The roof panels are always laid opposite the main weather direction in order to keep the wind influences on the joins to a minimum. Therefore, the installation begins on the side facing away from the wind. Extra care should be taken with the first panel to ensure flush alignment. It is advisable to stretch a guideline on the eaves side from one end of the building to the other to ensure fitting parallel to the substructure. |
 |
Using a drill screw fix the first panel to the substructure through the middle bead near the eaves. Use a saddle washer with a rubber seal to prevent water getting in. The screw must be suitable for the chosen type of substructure and must have a rubber seal and must be tightened in such a way that the seal is pushed together slightly. |
 |
Before putting the second panel in place, it’s a good idea to mark the first panel to show where the beams of the substructure are. |
 |
Only when the second panel has been fixed as described can the joint between the two panels be screwed together. If the panels are fitted in a different order than that described, it could be that the joints slip away from each other. A saddle washer with rubber seal must be fitted under the screw. |
|
Now repeat the whole process:
|
10.2. Overlapping the short joint
Sometimes it is necessary to join the insulated roof panels at the vertical joint. The following section describes the procedure for such an overlap along this edge.
Since there is no overlap on this edge as standard, this must be created by removing the lower sheet and the foam insulation. The data sheet for each panel will help you determine the length of the cut-back required.
 Preparation for overlapping the upper panel
First the lower panel is laid and then the upper panel is put in place so that it overlaps the lower one. This allows rainwater to drain away without running under the overlap flap. In addition, a self-adhesive seal should be applied to the lower panel at at least two. The final step is to fix the panels through the high beads.
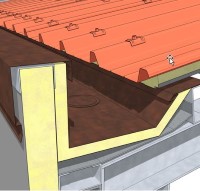
10.3. Completion of the eaves area
The exposed insulation at the front of the building must be protected from the influence of weather and from animals. In this section we will describe the different possibilities.
 |
The exposed insulation must be either painted with a waterproof coating or covered with a flashing. The advantage of a flashing is that animals can’t get to the foam, which they would then burrow into and pull out. |
 |
On request we can supply the panels for the eaves area with a drip edge. |
11. Approval of self-supporting insulated panels according to EU standard 14509
Insulated panels meet official approval. EU standard 14509 specifies the requirements for “factory-made self-supporting insulated panel elements with metal sheets on both sides”.
12. Fire protection classes and legislation on fire protection
In many of the scenarios where insulated panels are applied, fire protection plays an important role. The European standard DIN EN 13501 has been in place for a number of years. The European standard regulates fire protection classes much more closely.
Here is the corresponding EU table, which defines the fire resistance classes according to DIN EN 13501 and their assignment to the corresponding building supervisory requirements:
|
Building requirements |
Weight-bearing elements¹ |
Weight-bearing elements¹ |
Non-supporting internal walls |
Non-supporting external walls |
Raised floors |
Stand alone ceilings |
|
Fire-retardent |
R 30 |
REI 30 |
EI 30 |
E 30 (i→o) und |
REI 30 |
EI 30 (a↔b) |
|
Fire-retardent |
R 60 |
REI 60 |
EI 60 |
E 60 (i→o) und |
EI 60 (a↔b) |
|
|
Fire-resistant |
R 90 |
REI 90 |
EI 90 |
E 90 (i→o) und |
EI 90 (a↔b) |
|
|
Fire-resistance |
R 120 |
REI 120 |
- |
- |
||
|
Fire wall |
- |
REI-90M |
EI 90-M |
- |
- |
¹For reactive fire protection systems with components from coated steel, the specification IncSlow according to DIN EN 13501-2 is additionally required.
In addition to these general tables, there is a further table in which all insulated panels are classified. If you order panels from us, we always provide the European fire protection class:
Classification of fire performance of construction materials (excluding flooring) according to DIN EN 13501-1
|
Building requirements |
Additional requirements |
EU classification according to DIN EN 13501-1¹² |
||
|
No smoke |
No flammable dripping |
Construction materials, excl. linear pipe insulation |
Linear pipe insulation |
|
|
Non-flammable |
● |
● |
A1 |
A1L |
|
● |
● |
A2 - s1, d0 |
A2L - s1, d0 |
|
|
Fire-retardent |
● |
● |
B - s1, d0 C - s1, d0 |
BL - s1, d0 CL - s1, d0 |
|
● |
A2 - s2, d0 |
A2L - s2, d0 |
||
|
A2 - s3, d0 |
A2L - s3, d0 |
|||
|
B - s2, d0 B - s3, d0 |
BL - s2, d0 BL - s3, d0 |
|||
|
C - s2, d0 |
CL - s2, d0 |
|||
|
C - s3, d0 |
CL - s3, d0 |
|||
|
● |
A2 - s1, d1 |
A2L - s1, d1 |
||
|
A2 - s1, d2 |
A2L - s1, d2 |
|||
|
B - s1, d1 B - s1, d2 |
BL - s1, d1 BL - s1, d2 |
|||
|
C - s1, d1 |
CL - s1, d1 |
|||
|
C - s1, d2 |
CL - s1, d2 |
|||
|
A2 - s3, d2 B - s3, d2 C - s3, d2 |
A2L - s3, d2 BL - s3, d2 CL - s3, d2 |
|||
|
Normal flammability |
● |
D - s1, d0 |
DL - s1, d0 |
|
|
D - s2, d0 D - s3, d0 |
DL - s2, d0 DL - s3, d0 |
|||
|
E |
EL |
|||
|
D - s1, d1 |
DL - s1, d1 |
|||
|
D - s2, d1 |
DL - s2, d1 |
|||
|
D - s3, d1 |
DL - s3, d1 |
|||
|
D - s1, d2 |
DL - s1, d2 |
|||
|
D - s2, d2 |
DL - s2, d2 |
|||
|
D - s2, d3 |
DL - s2, d3 |
|||
|
E - d2 |
EL - d2 |
|||
|
Highly-flammable |
F |
FL |
||
¹ In the European testing and classifying rules, the smouldering performance of building materials is not recorded. For applications where the smouldering performance must be demonstrated, national regulations must be used.
² With the exception of classes A1 (not withstanding the use of footnote c to table 1 of DIN EN 13501-2 and E) the fire performance of surfaces on exterior wall cladding (types) cannot be conclusively classified according to DIN EN 13501-1.
Insulated panels with rock wool core are available up to a fire class of up to F120. This means therefore, that they can withstand fire for up to 120 minutes. The panels consist of between 95-99% molten volcanic rock, drawn into filaments to attains a fibrous structure. Certified sandwich panels with a core made of rock wool may be installed in areas subject to fire protection requirements. They can be used both as an internal fire wall, or external wall and also as a low ceiling, as a roof and even as insulation of existing buildings.
Last updated Aug 2025
Location and yard in Europe

From 10 locations, we can deliver across Europe